Sunday, October 20, 2013

Making a center-pull ball of yarn

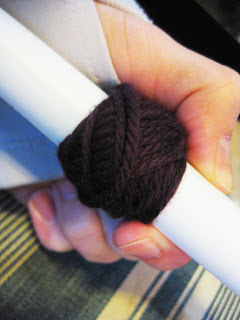
Often, when you buy yarn, it comes in a hank, and unless you purchased it somewhere with a yarn winder, you will need to wind a ball yourself, so here's how I make a center-pull ball of yarn, because center-pull balls are just better. First, you'll need the yarn hank and some kind of tube with a hollow center. I am using the lid for a candy thermometer in this example, but you can also use a toilet paper or paper towel roll.
First, unwind the hank and place it around the back of a chair, around a pillow or couch cushion, or even around your knees. 
Untie the yarn ball, then put one end of the yarn through the hollow tube, then start winding! Go from the base of one side to the top on the other and keep rotating the tube as you wind. 
 When you're done, simply remove the tube and you have a lovely center-pull ball.

Wednesday, August 14, 2013

Ombre Infinity Scarf

It seems like everything is ombre these days. I like ombre, but I feel like it's starting to get a little overdone. However, I do really like this ombre scarf. It's made of Tahki Yarns Rosa 100% cotton yarn. You just need one ball each of three colors (sand, taupe, and ebony). I made two different sizes. The larger one has three rows of each color, 110 dc/row, and the shorter one has 2 rows of each color with about 90 dc/row (I didn't write down the actual number. You can start with a basic chain or, as I did, with the base chain double crochet. This yarn is a little tricky to work with because of the texturing so it's sometimes hard to tell which loop is the 'extra' loop in the bcdc.

bcdc 110 (or 90 for smaller), join on the last dc (can also ch110, join, ch3, dc across)
work two (or one) more rows of black, switch to taupe
work three (or two) rows with taupe, switch to sand
work last three (or two) rows with sand, finish off. Easy peasy.


Thursday, August 1, 2013

Base Chain Double Crochet

One of the most frustrating things I came across as a beginning crocheter was that my starting chain was always always infuriatingly too tight. It didn't seem to matter how loose I made the chain, it always caused my projects to pinch and pull in funny ways. Then, one day, I learned the base chain double crochet. This is by far my favorite way to start a crochet project. It's a little tricky to master at first but once you get the hang of it I promise you'll love it. It gives your starting rows much more normal stretch, and if you've bought any of my patterns, you've probably noticed that I use this stitch a lot. You can also do base chain single, half double, or treble crochet.

Here is a photo tutorial on how to do a base chain double crochet (these are the same pictures I used in my shells and beads legwarmer pattern) .
1. Start out with a ch3. This counts as your first dc.
2. Yarn over, insert hook through first chain and pull up a loop
3. ch1
4. Yarn over and pull through two loops on hook twice to finish dc
5. For next st (and each subsequent stitch), yarn over and insert hook through ch1 of previous base chain double crochet stitch, pull up a loop.
6. ch1
7. yarn over and pull through two loops on hook twice to finish dc


You can also begin a base chain double crochet in the middle of a row of dc to make arm holes and button holes. To do this, you would yarn over, pull up a loop in your next st as normal, then ch1 to start the base chain, finish that dc, and continue with base chain double crochet. To reconnect to the previous row, when you insert your hook into the ch1 of the base chain double crochet, also insert through the stitch you want to reconnect to and pull up a loop through both loops, then finish the dc as usual. I used this technique in my spiral neckwarmer pattern (for the buttonholes) and in my toddler shrug pattern (for the arm holes).

Happy Crocheting!

Tuesday, July 30, 2013

Bridal Crochet

Lately I've been working on a lot of new patterns. My goal is to convert my etsy shop into mostly patterns, with a few finished items thrown in whenever I work up something new. I was looking for some inspiration and decided to make a treasury of cool crochet bridal pieces from etsy. None of these are my own work or my designs (and I certainly won't be copying them), but I think they're beautiful and it's nice to see the variety of things that crochet can do.


'Bridal Crochet' by kickincrochet

A collection of beautiful crochet bridal pieces


Crocheted shawl stole made t...
$85

Bridal cream white barefoot ...
$17

gold wire crochet earrings, ...
$32

Pearl- White Wedding Bridal ...
$50

BRIDAL SHRUG WEDDING bolero ...
$89

PDF Crochet Pattern Bridal F...
$5.5

Bridal Earrings, Wire Earrin...
$38

BRIDAL HAIR BAND wedding hai...
$35

Hand Crochet Bridal Ivory Bo...
$42

Ivory wedding bouquet bridal...
$195

Ivory Vintage Crochet Lace a...
$16.99

BLACK - Crochet Ribbon Lace ...
$10

crochet bridal sawl / hairpi...
$90

Bridal wedding dance shoes s...
$28

lace crochet earrings FOESTI...
$14

Elegant bridal hair comb wit...
$76

Sponsored by send bulk email from excel.

Wednesday, September 19, 2012

Wall Hangings

It's true, this post has nothing to do with crochet, but it's crafting and I figure most people I know who are into crochet are also into crafting so here ya go. I spent the last almost year working on an online medical coding and billing class (my husband is a physical therapist and wants to eventually open his own clinic). I finally finished and have a huge backlog of craft and crochet projects that I want to or need to finish. I recently finished a crocheted blanket for my niece's new baby, but I forgot to take pictures of it before I gave it to her so I'm waiting for her to send me one to post. Anyway, here's the first project I finished after the baby blanket.


This project is adapted from one I found at wayward girls crafts. The original post used 12x12 by 1" squares, but I used six 10x10x.5" squares. This way I could just use one piece of scrapbook paper per square and fold it over the sides to finish instead of having to cut more paper to finish the sides and corners. Besides, the biggest piece of foamboard I could find was 20x30x.5" so it worked out well. I had a very empty piece of wall above our master bed, and I think these are perfect for filling in the space. The first one I did (top right corner) ended up a little wrinkly because I didn't do a super great job of smoothing out the modpodge, but I definitely improved as I went. Bonus: they're super lightweight so if they happen to fall on our heads, it won't really hurt. I might make some more to go downstairs in our house.

I've had a few people ask if I'm going to try to sell them, and I'm not. They take too long to make, but they're really simple, so go make some yourself! You just need foamboard, modpodge or some other glue, and scrapbook paper.

Wednesday, September 7, 2011

Hello, Blogosphere!

I'm Kickin' some Crochet into gear here, trying to get things up and running on Etsy, Facebook, and here on blogger. It's a little overwhelming trying to get everything done. My biggest priority has been getting some products made. So far I've got some adorable hair clips, some elegant fingerless gloves, and a few headbands. It's hard to know when I've got enough stuff together to open up shop! I think I'm just going to have to bite the bullet, post what I've got, and see what happens. Before I can do that, however, I need to get my Etsy shop put together. So far I don't haven't even gotten myself signed up as a seller! Making things is so much more fun than selling them. :) If only I could make things as fast as I can think of them!